How To Improve Your WordPress Plugin’s Readme.txt

Email Newsletter
Weekly tips on front-end & UX.
Trusted by 200,000+ folks.


 Flexible CMS. Headless & API 1st

If you’re a plugin developer and you just love to write code, then writing a readme.txt file for a plugin in WordPress’ repository might be your idea of hell. When you’ve written all of that lovely code, why must you spend time writing about how to use it?

Unfortunately, some plugin developers view writing a readme.txt file as the least important part of their job. So, we end up with things like the following:
- Descriptions with only one line,
- Descriptions with hardly any information,
- No translation into English,
- Typos.
Why You Should Care About Your Readme.txt
A poorly written readme.txt does not necessarily indicate that the plugin is poorly written; the code could be mind-blowingly good. But it does give the impression of an overall lack of attention to detail and a lack of care for end users. You see, no one will notice if a readme file is particularly awesome, but they will notice if it’s bad.
You needn’t view the readme file as pain-in-the-butt homework that you’ve got to do after all the fun you’ve had with coding. A readme benefits you. Here’s how:
- Gives you an opportunity to say why your plugin is so good,
- Shows off your plugin’s features,
- Makes it easy for users to install and use the plugin,
- Anticipates support questions with a thorough FAQ,
- Links to your website and other products,
- Upsells your commercial services.
In this article, we’ll look at how to improve your WordPress readme file so that it benefits both your users and you.
But first, the mechanics.
Using (Quasi-)Markdown
Markdown is a text-to-HTML conversion tool, developed by John Gruber and Aaron Schwartz, that is used for readme files of plugins in the WordPress repository.
You write the readme in Markdown, and Markdown will convert it to HTML for the WordPress directory page, but it will still look good in WordPress’ back end and when you peek at it in your favorite text editor.
Take a look at the directory page for Simple Twitter Connect:
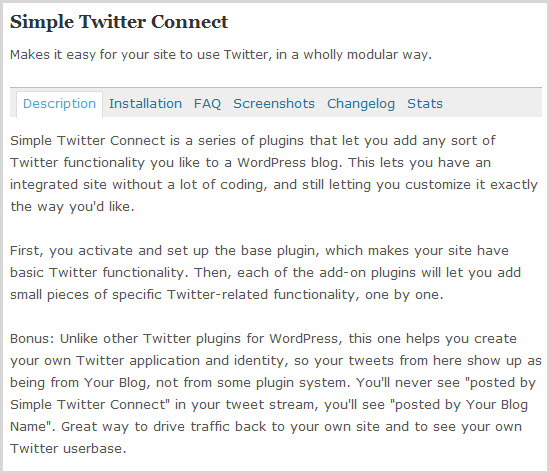
Simple Twitter Connect’s listing in the WordPress plugin directory.
Here’s how it appears when I download and extract the readme:
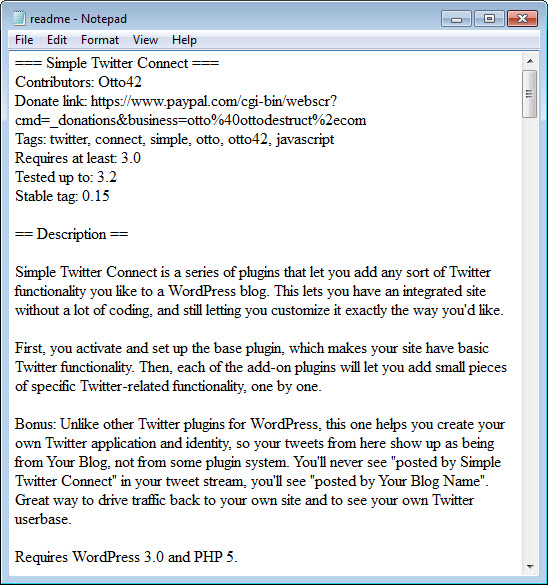
Simple Twitter Connect’s readme file in Notepad.
And here’s how it appears in WordPress’ back end:
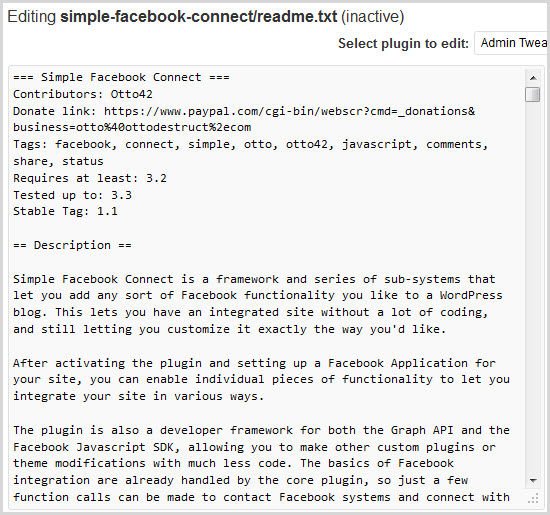
Simple Twitter Connect’s readme on the “Edit Plugin” page in the WordPress Dashboard.
It is readable no matter what medium it is viewed in. Imagine how difficult reading the readme in a text editor would be if it was marked up in HTML. Markdown makes your readme clear, readable and semantic.
WordPress.org uses what Mark Jacquith describes as quasi-markdown. It basically works like markdown, and much of the syntax is the same, but there are a few important differences, particularly in the headers.
To get you started with your WordPress readme, here’s a table containing the syntax that you’ll need.
| Syntax | Example | Outputs as | Use for |
|---|---|---|---|
| === foo === | === Plugin Name === | <h2>Plugin Name</h2> | Plugin name |
| == foo == | ==Description== | <h3>Description</h3> | Tabbed section headings |
| = foo = | =Inline heading= | <h4>Inline heading</h4> | Headings in the body of the readme |
| * foo | * list item, *list item | <ul> <li>list item</li> <li>list item</li> </ul> | Unordered list |
| 1. foo, 2. foo | 1. list item, 2. list item | <ol> <li>list item</li> <li>list item</li> </ol> | Ordered list |
| foo bar | You talking to me? | <blockquote>You talking to me?</blockquote> | block quotes |
| foo | emphasis | <em>emphasis</em> | Italics |
| foo | bold | <strong>bold</strong> | Bold |
| ‘foo’ | ‘wp-config.php’ | wp-config.php | Any code you want to display (including shortcodes) |
| link | WordPress | <a href=“https://wordpress.org/" title=“Your favorite software”>WordPress</a> | Links |
| <https://foobar.com> | <https://wordpress.org> | <a href=“https://wordpress.org"> https://wordpress.org</a> | Links |
| [youtube https://foobarvideo.com] | [youtube https://youtube.com/watch?v=CVmGBoPx6Ms] | <div class=‘video’><object width=‘532’ height=‘325’><param name=‘movie’ value=‘https://youtube.com/v/ CVmGBoPx6Ms?fs=1’></param> <param name=‘allowFullScreen’ value=‘true’></param><param name=‘allowscriptaccess’ value=‘never’></param><embed src=‘https://youtube.com/v/ CVmGBoPx6Ms?fs=1’ type=‘application/ x-shockwave-flash’ allowscriptaccess=‘never’ allowfullscreen=‘true’ width=‘532’ height=‘325’></embed></object></div> | Video |
Now that you know how to write in WordPress-flavored Markdown, let’s get started writing a readme.
Writing Your Readme.txt
Writing a readme is not hard, but putting a bit of thought into it beforehand does pay off.
- What do you think end users will need in order to get optimal use from your plugin?
- Do you need to include any special instructions or code snippets?
- What problems do you anticipate users running into?
- How can you make your plugin as attractive as possible?
- In a saturated market, what makes your plugin stand out?
With a bit of thought, you can produce a useful readme that shows off the best aspects of your plugin.
When writing the readme, remember that if people are able to use your plugin properly, then they will be less likely to come knocking on your door asking for help.
Let’s look at each of the main readme sections to see what you can do to improve it. As a reference point, we’ll use the readme for Simple Twitter Connect, which is concise, useful and well-formed.
Plugin Header
The plugin’s header contains basic information about your plugin that the user will take in at a glance. This information will be displayed in the plugin’s directory as a quick reference for users.
Here’s what you’ll need to complete it:
- Contributors. Anyone who has contributed to the plugin. You should use a contributor’s user name from WordPress.org, linking it to their WordPress.org profiles, which list all of the contributor’s plugins. Unfortunately, many developers don’t mention their WordPress user name, which means they miss out on the opportunity to showcase the rest of their work.

A contributor tag done right.

A contributor tag done wrong.
- Donate link. This is your chance to get a little something back from the WordPress community. If you don’t have a donate link, you aren’t giving people the opportunity to thank you!
- Tags. As on a blog, tags are used to categorize content. In a directory of 15,000+ WordPress plugins, using tags effectively makes it easy for people to find your plugin. Keep the tags relevant, and think of what people who need your plugin might be searching for. Some developers tag their plugins with words that are only tangentially related.

This listing for the Twitter tag isn’t helpful because it’s bloated with irrelevant content. As WordPress community members and contributors, we have a responsibility to keep the directory of plugins as intuitive as possible.
- Author URI. Your home page.
- Plugin URI. The plugin’s home page. Note that the Author URI and Plugin URI aren’t included in the readme template provided by WordPress. Including them is definitely a good thing because they direct people to your respective home pages.
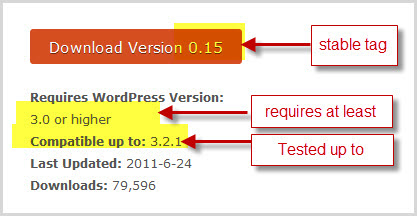
- Requires at least. This is the version of WordPress that your plugin requires. Some people don’t upgrade WordPress (some for valid reasons and some for dumb reasons). Tell them whether WordPress will work with their version.
- Tested up to. Another piece of important information. This tells people which version of WordPress your plugin has been tested up to.
- Stable tag. The stable tag tells WordPress which version of the plugin should appear in the directory. This should be in numeric format, which is much easier for WordPress to deal with. Aim for numbers like 1.5, 0.5 or whatever version you’re at. If your stable version is in the trunk in Subversion, then you can specify “trunk,” but that is the only time you should use words instead of numbers.
Here’s what the header information for Simple Twitter Connect looks like:
=== Simple Twitter Connect ===
Contributors: Otto42
Donate link: https://www.paypal.com/cgi-bin/webscr?cmd=_donations&business=otto%40ottodestruct%2ecom
Tags: twitter, connect, simple, otto, otto42, javascript
Requires at least: 3.0
Tested up to: 3.2
Stable tag: 0.15
Tips for Writing Header Information
- Use WordPress.org user names for contributors.
- Use a number for the stable tag.
- Include donation link to make some cash.
- Keep tags relevant.
- Test with the most recent WordPress version.
The Short Description
The short description is what appears on the WordPress.org page that lists plugins.

It also appears in the user’s list of installed plugins:

It’s your chance to craft a punchy 150-character description that will make people want to install your plugin.
Unfortunately, some people miss the mark:


I’m not sure what this one is all about:
None of these short descriptions tell you anything about what the plugin does. They’re totally useless in providing information to WordPress users.
Another problem is when developers do not add a short description at all. In that case, the 150 characters are excerpted from the long description. Check out the short description for Simple TrackbackSimple Trackback Validation with Topsy Blocker:

The short description cuts off in the middle of a word. We know that the plugin performs a test on trackbacks, but why? What for? How?
Short Descriptions That Get It Right
- Yet Another Related Posts Plugin “Display a list of related entries on your site and feeds based on a unique algorithm. Templating allows customization of the display.”
- BuddyPress “Social networking in a box. Build a social network for your company, school, sports team or niche community.”
- The Google+ Button “Adds the Google +1 button to your site so your visitors can vote to tell the world how great your site is!”
Tips for Writing a Short Description
- Stick to under 150 characters.
- Don’t rely on the text being pulled from the long description.
- Tell people what the plugin will do for them.
- Don’t worry about technical details. You can provide them in the long description.
- Tell people whether the plugin has any requirements to work, such as a subscription.
Long Description
The long description is where you really go to town. You’ve hooked people with the short description; now it’s time to sell your plugin. Let’s check out the long description for Simple Twitter Connect:
== Description ==
Simple Twitter Connect is a series of plugins that let you add any sort of Twitter functionality you like to a WordPress blog. This lets you have an integrated site without a lot of coding, and still letting you customize it exactly the way you’d like.

First, you activate and set up the base plugin, which makes your site have basic Twitter functionality. Then, each of the add-on plugins will let you add small pieces of specific Twitter-related functionality, one by one.

Bonus: Unlike other Twitter plugins for WordPress, this one helps you create your own Twitter application and identity, so your tweets from here show up as being from Your Blog, not from some plugin system. You’ll never see "posted by Simple Twitter Connect" in your tweet stream, you’ll see "posted by Your Blog Name". Great way to drive traffic back to your own site and to see your own Twitter userbase.

Requires WordPress 3.0 and PHP 5.

**Current add-ons**
* Login using Twitter
* Comment using Twitter credentials
* Users can auto-tweet their comments
* Tweet button (official one from twitter)
* Tweetmeme button
* Auto-tweet new posts to an account
* Manual Tweetbox after Publish
* Full @anywhere support
* Auto-link all twitter names on the site (with optional hovercards)
* Dashboard Twitter Widget

**Coming soon**
* More direct retweet button (instead of using Tweetmeme)
* (Got more ideas? Tell me!)

If you have suggestions for a new add-on, feel free to email me at otto@ottodestruct.com.
Want regular updates? Become a fan of my sites on Facebook!
https://www.facebook.com/apps/application.php?id=116002660893
https://www.facebook.com/ottopress
Or follow my sites on Twitter!
https://twitter.com/ottodestruct
What makes this a good example of a long description?
- The opening description is clear and useful. It tells you what the plugin does and how it works.
- The key features stand out (you can tell that the plugin creates your own Twitter app).
- The plugin’s requirements are listed.
- Markdown is used to break up the text into sections and lists, making it easier to read.
- All current features are listed.
- Planned features are listed.
- The developer has included links to his Facebook page and Twitter account.
A good long description is useful and relevant. It tells the user what the plugin does and how it does it, and it provide anything else that the developer feels is important. You can also use it to send users to your home page or social-media profiles.
Here are some other plugins with great long descriptions:
Tips for Writing a Long Description
- Use Markdown to bring some variety to the formatting. For example, add headings to break up sections, use lists, and put important points in bold.
- Be clear about the plugin’s features.
- Include any requirements, such as other plugins that your plugin relies on, or specific PHP versions.
- Link to any extended documentation on your website.
- Don’t be afraid to link to your website or social profiles.
- If you’ve got one, a video is a great demonstration tool.
Installation
The installation section should include everything that a person needs to get the plugin up and running correctly. Often, you can keep this brief. Check out the instructions for Simple Twitter Connect:
1. Upload 'plugin-name.php' to the '/wp-content/plugins/' directory,
2. Activate the plugin through the 'Plugins' menu in WordPress.
For many plugins, this will suffice. But some plugins need detailed instructions. Check out the ones for these:
Users need mammoth instructions to set up both of these plugins. WP Super Cache requires you to look in your .htaccess file, and Domain Mapping needs you to move files to /wp-content/ and to edit wp-config.php.
Tips for Writing Instructions
- Be brief, a few lines if possible.
- Include everything the user needs to install the plugin.
- Make sure each step logically follows the preceding one.
- Include any code snippets that the user might need.
- Be clear and concise. This is the place for instructions, not sales.
FAQ
The FAQ (frequently asked questions) section is your opportunity to troubleshoot problems before they even get posted to WordPress’ support forums. OK, so a few people will probably never bother looking at the FAQ to see whether their question is addressed there, which is annoying, but at least you will be able to direct them to the FAQ.
Some FAQs, however, are pretty lousy. In fact, some plugins, even popular ones, lack any FAQ at all. This is a problem: if too many plugin developers don’t include an FAQ, then some WordPress users will assume that plugins normally don’t have one and will run straight to the support forums. This wastes the time of people who have taken the trouble to include an FAQ.
Let’s check out the FAQ for Simple Twitter Connect:
>== Frequently Asked Questions ==

= Whoa, what's with all these plugins? =
The principle behind this plugin is to enable small pieces of Twitter functionality, one at a time.

Thus, you have the base plugin, which does nothing except to enable your site for Twitter OAuth in general. It's required by all the other plugins.

Then you have individual plugins, one for each piece of functionality. One for enabling comments, one for adding Login, etc. These are all smaller and simpler, for the most part, because they don't have to add all the Twitter connections stuff that the base plugin adds.

= The comments plugin isn't working! =

You have to modify your theme to use the comments plugin.

In your comments.php file (or wherever your comments form is), you need to do the following.

1. Find the three inputs for the author, email, and url information. They need to have those ID's on the inputs (author, email, url). This is what the default theme and all standardized themes use, but some may be slightly different. You'll have to alter them to have these ID's in that case.

2. Just before the first input, add this code:
[div id="comment-user-details"]
[?php do_action('alt_comment_login'); ?]
(Replace the []'s with normal html greater/less than signs).

3. Just below the last input (not the comment text area, just the name/email/url inputs, add this:
[/div]

That will add the necessary pieces to allow the script to work.

Hopefully, a future version of WordPress will make this simpler.

= Twitter Avatars look wrong. =

Twitter avatars use slightly different code than other avatars. They should style the same, but not all themes will have this working properly, due to various theme designs and such.

However, it is almost always possible to correct this with some simple CSS adjustments. For this reason, they are given a special "twitter-avatar" class, for you to use to style them as you need. Just use .twitter-avatar in your CSS and add styling rules to correct those specific avatars.

= Why can't I email people who comment using Twitter? =

Twitter offers no way to get a valid email address for a user. So the comments plugin uses a fake address of the twitter's username @fake.twitter.com. The "fake" is the giveaway here.

= When users connect using Twitter on the Comments section, there's a delay before their info appears. =

Yes. In order to make the plugin more compatible with caching plugins like WP-Super-Cache, the data for a Twitter connect account is retrieved from the server using an AJAX request. This means that there will be a slight delay while the data is retrieved, but the page has already been loaded and displayed. Most of the time this will not be noticeable.

= Why does the settings screen warn me that I don't have a URL shortener plugin? =

Simple Twitter Connect does not implement a URL shortening service in favor of letting other plugins implement one for it. WordPress 3.0 includes a new shortlink method for plugins to implement this properly.

A shortener plugin should implement the "get_shortlink" filter for it to be detected. WordPress 3.0 will be required for this to work.

The WordPress.com stats plugin implements this, and it provides shortlinks to "wp.me" URLs. If you wish to use another shortener plugin, tell that plugin's author to implement this same standard, and the plugin will automatically be detected and used by Simple Twitter Connect.
That’s a pretty thorough FAQ! It’s useful because it anticipates any questions a user might have. It’s a pre-emptive strike: get in there with the answers before you see anxiety explosions in the support forums.
When writing support documentation such as an FAQ, aim at the lowest common denominator. A developer who is using your plugin likely won’t need an FAQ, and if they do, they’ll probably get the gist of it quickly and be able to implement it in an instant. There’s a rumor going around that WordPress is easy to use, which means that a lot of people who don’t know a whole lot about code will be fiddling around with it and break stuff. They are the people to whom you should be addressing your documentation, because they’ll be giving you the biggest headaches in the support forums.
Tips for Writing an FAQ
- Anticipate issues and answer them in advance.
- Deal with any known conflicts with old WordPress versions or other plugins.
- If a problem recurs in the support forums, add it to your FAQ.
- Use Markdown to highlight each question and follow it with an answer.
- Include any code snippets or shortcodes that the user might need.
- The FAQ is a tool to help you. Use it properly, and save some money on Aspirin.
Screenshots
Unfortunately, many developers think that screenshots are the realm of theme designers. Perhaps you assume that there’s nothing exciting or sexy to see in your plugin, so why bother providing screenshots? Check out the screenshots for Simple Twitter Connect. They show both the UI and the front end of the plugin, giving you an idea what it will be like before installing it.
Screenshots help users decide whether a plugin is right for them. As a developer, you might not think your UI is particularly interesting, but as an end user, I like to look at the settings before installing a plugin. It might not be a deal-breaker, but it does help me decide.
Here are some plugins with nice screenshots:
First, you activate and set up the base plugin, which makes your site have basic Twitter functionality. Then, each of the add-on plugins will let you add small pieces of specific Twitter-related functionality, one by one.
Bonus: Unlike other Twitter plugins for WordPress, this one helps you create your own Twitter application and identity, so your tweets from here show up as being from Your Blog, not from some plugin system. You’ll never see “posted by Simple Twitter Connect” in your tweet stream, you’ll see “posted by Your Blog Name”. Great way to drive traffic back to your own site and to see your own Twitter userbase.
Requires WordPress 3.0 and PHP 5.
Current add-ons * Login using Twitter * Comment using Twitter credentials * Users can auto-tweet their comments * Tweet button (official one from twitter) * Tweetmeme button * Auto-tweet new posts to an account * Manual Tweetbox after Publish * Full @anywhere support * Auto-link all twitter names on the site (with optional hovercards) * Dashboard Twitter Widget
Coming soon * More direct retweet button (instead of using Tweetmeme) * (Got more ideas? Tell me!)
If you have suggestions for a new add-on, feel free to email me at otto@ottodestruct.com. Want regular updates? Become a fan of my sites on Facebook! https://www.facebook.com/apps/application.php?id=116002660893 https://www.facebook.com/ottopress Or follow my sites on Twitter! https://twitter.com/ottodestruct
What makes this a good example of a long description?
- The opening description is clear and useful. It tells you what the plugin does and how it works.
- The key features stand out (you can tell that the plugin creates your own Twitter app).
- The plugin’s requirements are listed.
- Markdown is used to break up the text into sections and lists, making it easier to read.
- All current features are listed.
- Planned features are listed.
- The developer has included links to his Facebook page and Twitter account.
A good long description is useful and relevant. It tells the user what the plugin does and how it does it, and it provide anything else that the developer feels is important. You can also use it to send users to your home page or social-media profiles.
Here are some other plugins with great long descriptions:
Tips for Writing a Long Description
- Use Markdown to bring some variety to the formatting. For example, add headings to break up sections, use lists, and put important points in bold.
- Be clear about the plugin’s features.
- Include any requirements, such as other plugins that your plugin relies on, or specific PHP versions.
- Link to any extended documentation on your website.
- Don’t be afraid to link to your website or social profiles.
- If you’ve got one, a video is a great demonstration tool.
Installation
The installation section should include everything that a person needs to get the plugin up and running correctly. Often, you can keep this brief. Check out the instructions for Simple Twitter Connect:
1. Upload 'plugin-name.php' to the '/wp-content/plugins/' directory,
2. Activate the plugin through the 'Plugins' menu in WordPress.
For many plugins, this will suffice. But some plugins need detailed instructions. Check out the ones for these:
Users need mammoth instructions to set up both of these plugins. WP Super Cache requires you to look in your .htaccess file, and Domain Mapping needs you to move files to /wp-content/ and to edit wp-config.php.
Tips for Writing Instructions
- Be brief, a few lines if possible.
- Include everything the user needs to install the plugin.
- Make sure each step logically follows the preceding one.
- Include any code snippets that the user might need.
- Be clear and concise. This is the place for instructions, not sales.
FAQ
The FAQ (frequently asked questions) section is your opportunity to troubleshoot problems before they even get posted to WordPress’ support forums. OK, so a few people will probably never bother looking at the FAQ to see whether their question is addressed there, which is annoying, but at least you will be able to direct them to the FAQ.
Some FAQs, however, are pretty lousy. In fact, some plugins, even popular ones, lack any FAQ at all. This is a problem: if too many plugin developers don’t include an FAQ, then some WordPress users will assume that plugins normally don’t have one and will run straight to the support forums. This wastes the time of people who have taken the trouble to include an FAQ.
Let’s check out the FAQ for Simple Twitter Connect:
>== Frequently Asked Questions ==

= Whoa, what's with all these plugins? =
The principle behind this plugin is to enable small pieces of Twitter functionality, one at a time.

Thus, you have the base plugin, which does nothing except to enable your site for Twitter OAuth in general. It's required by all the other plugins.

Then you have individual plugins, one for each piece of functionality. One for enabling comments, one for adding Login, etc. These are all smaller and simpler, for the most part, because they don't have to add all the Twitter connections stuff that the base plugin adds.

= The comments plugin isn't working! =

You have to modify your theme to use the comments plugin.

In your comments.php file (or wherever your comments form is), you need to do the following.

1. Find the three inputs for the author, email, and url information. They need to have those ID's on the inputs (author, email, url). This is what the default theme and all standardized themes use, but some may be slightly different. You'll have to alter them to have these ID's in that case.

2. Just before the first input, add this code:
[div id="comment-user-details"]
[?php do_action('alt_comment_login'); ?]
(Replace the []'s with normal html greater/less than signs).

3. Just below the last input (not the comment text area, just the name/email/url inputs, add this:
[/div]

That will add the necessary pieces to allow the script to work.

Hopefully, a future version of WordPress will make this simpler.

= Twitter Avatars look wrong. =

Twitter avatars use slightly different code than other avatars. They should style the same, but not all themes will have this working properly, due to various theme designs and such.

However, it is almost always possible to correct this with some simple CSS adjustments. For this reason, they are given a special "twitter-avatar" class, for you to use to style them as you need. Just use .twitter-avatar in your CSS and add styling rules to correct those specific avatars.

= Why can't I email people who comment using Twitter? =

Twitter offers no way to get a valid email address for a user. So the comments plugin uses a fake address of the twitter's username @fake.twitter.com. The "fake" is the giveaway here.

= When users connect using Twitter on the Comments section, there's a delay before their info appears. =

Yes. In order to make the plugin more compatible with caching plugins like WP-Super-Cache, the data for a Twitter connect account is retrieved from the server using an AJAX request. This means that there will be a slight delay while the data is retrieved, but the page has already been loaded and displayed. Most of the time this will not be noticeable.

= Why does the settings screen warn me that I don't have a URL shortener plugin? =

Simple Twitter Connect does not implement a URL shortening service in favor of letting other plugins implement one for it. WordPress 3.0 includes a new shortlink method for plugins to implement this properly.

A shortener plugin should implement the "get_shortlink" filter for it to be detected. WordPress 3.0 will be required for this to work.

The WordPress.com stats plugin implements this, and it provides shortlinks to "wp.me" URLs. If you wish to use another shortener plugin, tell that plugin's author to implement this same standard, and the plugin will automatically be detected and used by Simple Twitter Connect.
That’s a pretty thorough FAQ! It’s useful because it anticipates any questions a user might have. It’s a pre-emptive strike: get in there with the answers before you see anxiety explosions in the support forums.
When writing support documentation such as an FAQ, aim at the lowest common denominator. A developer who is using your plugin likely won’t need an FAQ, and if they do, they’ll probably get the gist of it quickly and be able to implement it in an instant. There’s a rumor going around that WordPress is easy to use, which means that a lot of people who don’t know a whole lot about code will be fiddling around with it and break stuff. They are the people to whom you should be addressing your documentation, because they’ll be giving you the biggest headaches in the support forums.
Tips for Writing an FAQ
- Anticipate issues and answer them in advance.
- Deal with any known conflicts with old WordPress versions or other plugins.
- If a problem recurs in the support forums, add it to your FAQ.
- Use Markdown to highlight each question and follow it with an answer.
- Include any code snippets or shortcodes that the user might need.
- The FAQ is a tool to help you. Use it properly, and save some money on Aspirin.
Screenshots
Unfortunately, many developers think that screenshots are the realm of theme designers. Perhaps you assume that there’s nothing exciting or sexy to see in your plugin, so why bother providing screenshots? Check out the screenshots for Simple Twitter Connect. They show both the UI and the front end of the plugin, giving you an idea what it will be like before installing it.
Screenshots help users decide whether a plugin is right for them. As a developer, you might not think your UI is particularly interesting, but as an end user, I like to look at the settings before installing a plugin. It might not be a deal-breaker, but it does help me decide.
Here are some plugins with nice screenshots:
Tips for Putting Together Screenshots
- Name screenshots as screenshot-1.png, screenshot-2.png, etc.
- Include at least one screenshot of the UI, and one of what it does in the front end (if it does anything there).
- Keep the size of the screenshot file small.
Other Notes
Including “Other Notes” is not essential. Many plugins don’t have them; Simple Twitter Connect doesn’t, for instance. But the section is useful if you have additional information that doesn’t necessarily fit in any other section.
Things You Can Include in “Other Notes”
- Credits
- To-do list
- Localizations
- Filters
- Set-up guide
- Requirements
- External links
- Upgrading information
- Licence
Changelog
A changelog, as you would guess, is a log of all changes you’ve made to the plugin. It is an important part of the documentation and shouldn’t be ignored. A changelog may not make for the most exciting reading, but it is helpful. It tells a user what changes have been made to a plugin, and it makes clear why the user should update. It’s also useful for tracking the development of the plugin over time. A changelog gives a plugin context and history, and that can be important for people running big projects or important client websites.
Here’s a scenario: a user sees an alert in the admin area telling them that they need to update a plugin.
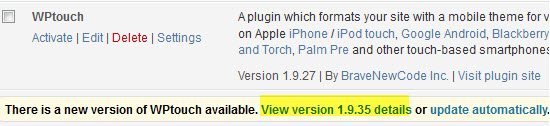
This user needs to update WP Touch!
The changelog shows the changes, so that the user can decide whether to update.
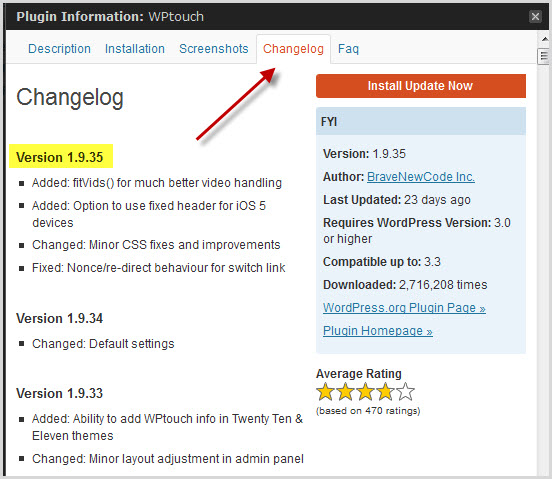
The changelog helps us decide.
Maintaining some websites is a balancing act, and some administrators don’t want to upgrade unless absolutely necessary (say, for security updates or for new must-have features). Give them the information they need to be able to decide for themselves. If the update is minor, they might decide to save themselves the hassle and wait until something major arrives.
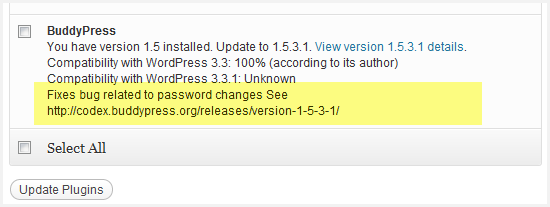
The changelog for Simple Twitter Connect is lengthy, not surprisingly. You’ll see all of the minor and major changes that have been made. Being able to see this plugin’s history and development is so useful.
Tips for Writing the Changelog
- No change is insignificant. Make sure to add every single change.
- The changelog must have the most recent changes first.
Upgrade Notice
Tips for Writing Upgrade Notices
- keep your upgrade notices short and descriptive. Aim to be informative.
Bonus - Adding a Banner Image
Since this article was published, WordPress have made it even easier for your to show off your plugin in the WordPress plugin directory. Matt announced that he had been looking for ways to give plugin authors more control over their plugin page on the directory. The first step was introducing banner images for plugin pages. Check out the banner image on Hello Dolly.
Note: WordPress.org are still experimenting with plugin pages so these may change.
To add a banner image to your plugin page:
- Create a 772 x 250 pixel jpg or png (no GIFs)
- Check it in to your plugin’s SVN directory with the path
assets/banner-772x250.(jpg|png). Note: theassetsdirectory is added to your plugin’s root directory, not the trunk - your banner image will appear on the next plugin directory refresh (happens every 15 minutes).
Conclusion
Underestimating the importance of the readme file does a disservice to your code and to the WordPress community; so, seeing so many plugin developers do just that is sad. Don’t fight the readme: embrace it. It’s an important part of your documentation. A good readme is useful, helping users get set up to use the plugin as effectively as possible. And it’s useful to you, the developer. The readme demonstrates your plugin and anticipates problems, and it’ll save you time and headaches with support requests.
Here are some useful resources to get your plugin ready for the WordPress repository:
- WordPress readme.txt template The readme.txt template provided by WordPress.org. Download it and stick your readme text in it to get started.
- WordPress readme.txt validator Validating your readme before submitting it is helpful. This tool will flag any issues so that you can get it just right.
- WordPress Plugin Readme File Generator Feeling lazy? If you would prefer to fill in a form than write up a readme.txt file, try this generator.
- “How to Publish to the WordPress Plugin Repository” There’s more to publishing in the repository than writing a readme. This tutorial takes you through the steps to getting published.
- “How to Write a WordPress Plugin: 12 Essential Guides and Resources” Haven’t even started writing your plugin yet? Check out this collection of plugin development resources.
Further Reading on SmashingMag:
- Ten Things Every WordPress Plugin Developer Should Know
- Making A WordPress Plugin That Uses Service APIs
- How Commercial Plugin Developers Are Using The Repository


